Bathrooms may be the most private spaces in a home, but they are also one of the most frequently used—and the most valuable when it comes to resale. In Dubai and across the UAE, homeowners are increasingly investing in modern, spa-like bathrooms that combine functionality with luxury. But before you dive into selecting tiles or browsing fittings, it’s essential to understand the bathroom renovation process in detail.
Whether you’re renovating a compact apartment washroom or a luxury villa master bath, the steps remain largely the same. Following a structured plan ensures your project is stress-free, budget-friendly, and beautifully executed.
In this guide, we’ll walk you through the step-by-step bathroom renovation process, highlight common pitfalls, and show you how to achieve a result that matches your vision.
Why Understanding the Bathroom Renovation Process Matters
Renovating a bathroom isn’t just about swapping fixtures—it involves plumbing, waterproofing, electrical work, tiling, and careful planning. A clear roadmap helps you:
- Avoid costly mistakes.
- Stick to a realistic timeline.
- Coordinate with contractors efficiently.
- Ensure safety and compliance with Dubai building codes.
- Achieve a design that balances luxury and practicality.
Let’s break down the bathroom renovation process step by step.
Step 1: Initial Planning and Budgeting
Every successful renovation starts with a clear plan. Ask yourself:
- What’s my budget?
- Am I going for a complete remodel or just surface updates?
- Do I want a modern, minimal look or a luxurious spa-inspired design?
This is also the stage to consult an interior design company in Dubai that specializes in bathrooms. Professionals can give you cost estimates, timeline projections, and creative design ideas you may not have considered.
Tip: Always allocate 10–15% of your budget as a buffer for unexpected costs during the bathroom renovation process.

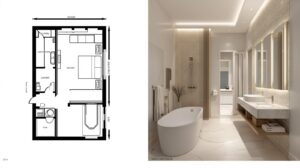
Step 2: Bathroom Layout and Design
Once your budget is set, it’s time to design the layout. Key considerations include:
- Space Planning: Where will the shower, bathtub, vanity, and toilet be located?
- Ergonomics: Is there enough room to move comfortably?
- Ventilation: Bathrooms in Dubai’s humid climate require good airflow to prevent mold.
- Aesthetics: Choose a design style—modern minimalism, Arabic-inspired, or luxury European.
This stage often involves creating 2D layouts and 3D renders so you can visualize your bathroom design before construction begins.
Read more on How to Choose the Right Interior Designer in Dubai
Step 3: Demolition and Site Preparation
The next stage of the bathroom renovation process is demolition. Out go the old tiles, fittings, and cabinetry. Contractors prepare the site for fresh work while ensuring plumbing and electrical lines are safely capped.
Demolition is messy, but it’s essential. Proper site preparation prevents future issues such as water leaks or uneven flooring.

Step 4: Plumbing and Electrical Work
Bathrooms rely heavily on two systems—plumbing and electricity. Before tiling or fitting anything new, professionals will:
- Relocate or replace pipes.
- Install drainage systems with correct slopes.
- Update electrical wiring for lighting, fans, or heated towel racks.
- Add waterproof outlets for appliances like hair dryers or bidets.
Skipping this step or cutting corners here is one of the most common mistakes in the bathroom renovation process. Always hire certified plumbers and electricians to ensure safety and compliance.

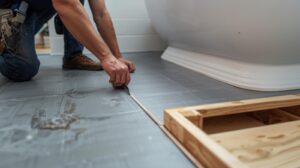
Step 5: Waterproofing and Subflooring
Water is the biggest enemy of a bathroom. Proper waterproofing is crucial to protect your home from leaks and long-term structural damage. Contractors apply waterproof membranes to walls and floors, especially around showers and bathtubs.
After waterproofing, subflooring is prepared to ensure the surface is level before tiles are installed.
Step 6: Tiling the Walls and Floors
Tiling is one of the most transformative stages of the bathroom renovation process. Your choice of tile sets the tone for the entire bathroom.
- Ceramic or Porcelain Tiles: Durable and easy to clean.
- Natural Stone: Luxury option but requires sealing.
- Mosaic Tiles: Perfect for accent walls or shower niches.
Proper alignment, grout spacing, and sealing are critical for a polished finish. This step usually takes several days, depending on the size of the bathroom.

Step 7: Installing Fixtures and Fittings
Now the bathroom begins to take shape. Key installations include:
- Toilet and bidet.
- Shower enclosure or bathtub.
- Vanity units and sinks.
- Faucets, mixers, and showerheads.
This stage is exciting for homeowners because the space starts resembling the design they envisioned. Choosing premium fixtures adds both functionality and elegance.
Step 8: Lighting and Ventilation
Lighting can make or break your bathroom. Layered lighting—ambient, task, and accent—creates a luxurious atmosphere. Popular options in Dubai include LED mirrors, recessed ceiling lights, and pendant fixtures above vanities.
Equally important is ventilation. A good exhaust fan prevents moisture buildup, ensuring your bathroom stays fresh and mold-free.

Step 9: Storage Solutions
A clutter-free bathroom feels more spacious and serene. Consider:
-
- Floating vanities with drawers.
- Built-in niches in shower walls.
- Overhead cabinets with sleek finishes.
Smart storage is an often-overlooked part of the bathroom renovation process, but it dramatically improves daily usability.

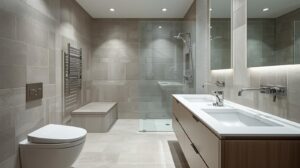
Step 10: Finishing Touches and Styling
Finally, it’s time to add finishing touches. Think mirrors, towel racks, plants, rugs, and décor elements that reflect your personal style. Even luxury accessories like heated towel rails or smart toilets can be added here.
At this stage, your bathroom transforms from a construction site to a personal retreat.

Step 11: Final Inspection and Handover
Before signing off the project, conduct a thorough inspection:
- Check plumbing connections for leaks.
- Ensure electrical fittings work correctly.
- Confirm waterproofing integrity.
- Review the finishing quality of tiles and fixtures.
A professional interior company will provide warranties and after-service support, ensuring peace of mind.

Common Mistakes to Avoid in a Bathroom Renovation
- Ignoring waterproofing.
- Choosing the wrong tile material.
- Poor ventilation planning.
- Skipping professional consultation.
- Not allocating enough storage.
Avoiding these errors will save you money and headaches in the long run.
How Long Does the Bathroom Renovation Process Take?
On average, a standard bathroom renovation in Dubai takes 3–6 weeks, depending on the complexity of the project. Luxury villa bathrooms with custom designs may take longer—up to 8–10 weeks.
Timelines are influenced by design approvals, material availability, and decision-making speed.
Read more on Top 10 Mistakes Homeowners Make During Renovations
Final Thoughts
The bathroom renovation process may seem overwhelming, but when broken into clear steps, it becomes manageable and even exciting. From planning and demolition to tiling and finishing touches, every stage contributes to creating a bathroom that enhances your lifestyle.
If you’re looking to transform your space into a modern, functional, and luxurious retreat, working with experienced professionals is key.
With Interiofy®, you can bring your dream bathroom to life. Our team specializes in delivering bespoke bathroom renovations in Dubai that blend style, comfort, and precision. Contact us today to begin your renovation journey!